WIFI REEL

What are the different version of the WiFi Reel ?

There is different version of WiFi Reel with different connexion with the drone. The overall functioning is not different between the generations, the difference can be spotted in some details listed below.
Do not hesitate to contact us to know which generation you are using.

Version 1
When turning on the WiFi Reel the status LED will flash once white then quickly blue.
Charging time: 14h
Using time: 8h
You cannot charge and use the WiFi Reel at the same time

Version 2
When turning on the WiFi Reel nothing appears until several seconds when the status LED start flashing quickly in blue.
Charging time: 6h
Using time: 8h
You can charge and use the WiFi Reel at the same time

Version 3
When turning on the WiFi Reel nothing appears until several seconds when the status LED start flashing quickly in blue.
The Blue LED will constantly flashes in blue regardless if the WiFi Reel is connected or not with the drone and the tablet.
The password to connect will be given by Notilo Plus Team and you won’t be able to find it thanks to SEASAM Control App.
Charging time: 6h
Using time: 8h
You can charge and use the WiFi Reel at the same time
What is the meaning of the LED on the WiFi Reel ?

There are two LED on the WiFi Reel. One showing the status of the WiFi Reel when the other is showing the level of battery.

Meaning of the status LED (version 1 and 2)

  • Fast Blue Blink: The WiFi Reel is on. No drone is detected.
  • Slow blue flashing: The WiFi Reel is on. A drone is detected.
  • Fixed Blue: The WiFi Reel is on. A drone is detected and the WiFi connection is established with the control unit.
  • Flashing orange: Low battery level.

Meaning of the status LED during charge (all versions)

  • Fixed orange: The WiFi Reel is charging.
  • Fixed green: The WiFi Reel is fully charged.

Is there different type of connexion ?

There are two different types of connexion independent from the versions of WiFi Reel.

Standard connexion
This connector is not waterproof. Be sure to always check there is no water left and dry it if needed.
When not using it keep always the black caps closed.

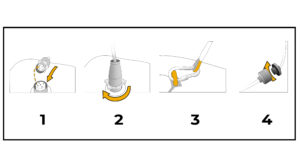
To connect the WiFi Reel to the drone, first remove the black protective cap on the drone and the connector of the WiFi Reel cable.
Screw the two caps together to prevent them from hanging and getting stuck in the engines. And thus avoid any damage to the drone.
Screw the WiFi Reel cable to the drone, making sure to align the cable guide in the plug on the drone.
Hold the connector straight and screw the cable to the drone, using the screw ring provided for this purpose. There is no need to force, use the screw ring.


Subconn connexion
This connector is waterproof. You can open it underwater if needed. In order to ensure the longevity of the connector regularly put grease on the pins.

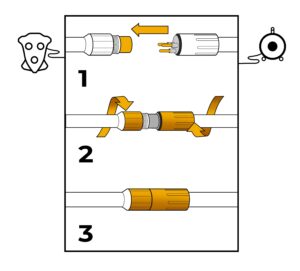
On the drone and on the WiFi Reel, unscrew the red nuts and separate the tips.
Make sure to reconnect the tip of the drone connector to the connector of the WiFi Reel so as not to lose it.


Connect the cable connector to the drone connector and screw back the red nut.

What is the WiFi Reel?

The WiFi Reel is composed of two elements:

  • A cable with a variable length.
  • A cable reel with an integrated iOS / Android compatible WiFi Reel for SEASAM control with live video feedback.

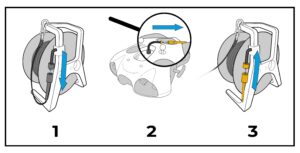
Connect the reel cable to the drone and connect the control unit with the Seasam Control Application to the WiFi Reel.
Then drive the drone remotely with video feedback from the drone camera live on the control unit