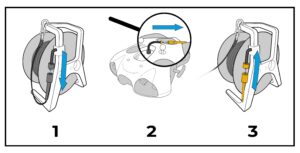
It depends on the use: if ROV mode, you don’t need the WiFi Reel, if other uses such as automatic localisation for boat inspection, you will need the WiFi Reel in this case.
You can also refer to the user manual.
It depends on the use: if ROV mode, you don’t need the WiFi Reel, if other uses such as automatic localisation for boat inspection, you will need the WiFi Reel in this case.
You can also refer to the user manual.
Each time you see an error on the screen of the underwater remote, check if your Seasam drone is up to date. Refer to the user guides to see how to do it.
Try to turn off and on again the drone leaving the underwater remote on the drone until it indicates “disarmed ready”.
If the indication “Error – #acoustic” remains on the screen, it means the Seasam drone may have an issue with its acoustic system.
Contact us for support at support@notiloplus.com.
Do not open the drone or perform any repair yourself
Each time you see an error on the screen of the underwater remote, check if your Seasam drone is up to date. Refer to the user guides to see how to do it.
Try to turn off and on again the drone leaving the underwater remote on the drone until it indicates “disarmed ready”.
If the indication “Error – Transmittor KO” remains on the screen, it means the underwater remote may have an issue with its transmitter.
Contact us for support at support@notiloplus.com.
Do not open the remote or perform any repair yourself
Each time you see an error on the screen of the underwater remote, check if your Seasam drone is up to date. Refer to the user guides to see how to do it.
Try to turn off and on again the drone leaving the underwater remote on the drone until it indicates “disarmed ready”.
If the indication “Error – TCND acoustics” remains on the screen, it means the underwater remote may have an issue with its transmitter.
Contact us for support at support@notiloplus.com.
Do not open the remote or perform any repair yourself
Batteries, whether charged or not, must be store in a dry place.
Caution ! After the dive, do not store them in the same place as the wet drone. Do not leave the battery plugged or connected to the drone as well. The batteries are not waterproof !
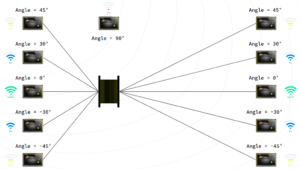
The WiFi connection between the WiFi Reel and the Unit control is made thanks to an antenna. The antenna is omnidirectional; however it emits best on the two faces of the WiFi Reel.
When using Seasam in ROV Mode, make sure:
To ensure a better use of the drone do not forget to calibrate it on regular basis or every dive as well as the remote controller.
Connect the drone to the WiFi Reel and SEASAM Control. Put the drone on a flat and stable surface.
On SEASAM Control go to the “Settings” tab and select “Drone Calibration”.
Your drone is now calibrated.
With Seasam Control you can record medias from the drone’s internal camera.
To ensure the record is saved on the drone’s SD card do not shut down neither the drone nor the Seasam App nor the Explorer Cable & WiFi Reel before the end of the record.
Wait until you have finished recording before turning off all the equipment.
Open the Seasam Control application. A page concerning the configuration mode opens, scroll down this page and select the tab allowing you to connect to the Internet. Then click on “Continue”.
The settings tab opens. Open the menu and select “Interface”. You can now check the “Map” box and save the changes.
You can return to the home screen. The map now appears as a miniature in the corner of your screen. Click on it to make it your main screen.
By zooming out as much as possible, you can virtually go to the place where you want to make your dive.
Finally, go back to your settings and select “Choose New Configuration”, then you can select “Cartography”. You are now able to calibrate propely your equipment.
No, it is not possible to use the Ground Station while it is charging. You will have to wait until the end of its charging to use it.
The charging time for the Ground Station is 3 hours for 3.5 hours of autonomy. The Ground Station is charged with a dedicated charger.
The charging time of the Navigator is 2 hours for 6 hours of autonomy. Please keep in mind that this may vary depending on your use of the equipment.
To charge the Navigator, you will find a suitable charger.
When the Navigator is fully charged, all LEDs will go out.
Press the ON/OFF button. The Navigator’s two green center LEDs will light up.
The Navigator is operational as soon as the outer left LED is stable.
Press the ON/OFF button. After a few seconds, the battery LED will turn off and the other LEDs will turn off out after a few seconds.
Place the battery in your drone. Unscrew your battery compartment and place the battery in the dedicated slot. You should hear a beep indicating that the battery is properly positioned. Unscrew the battery compartment completely until there is no more space.
Connect the cable between the drone and the Navigator. For the Navigator, the connection is located in the lower part, the central location among the 3. A drone icon on a sticker will allow you to better visualize this connection. Check that the connectors are correctly plugged in by gently pulling on the connector.
Do not forget to screw the two caps together.
Finally, secure the cable to the drone and Navigator with the two carabiners.
Yes, SEASAM is equipped with a sensor that allows the drone to identify obstacle within a 1,5 meters radius.
However, obstacles avoidance is deactivated in this case :
The drone is not able to take decisions, it will stop when facing an obstacle and wait for another command. Always keep an eye on SEASAM while diving with it.
In any case, please remember that SEASAM is always under your responsibility.
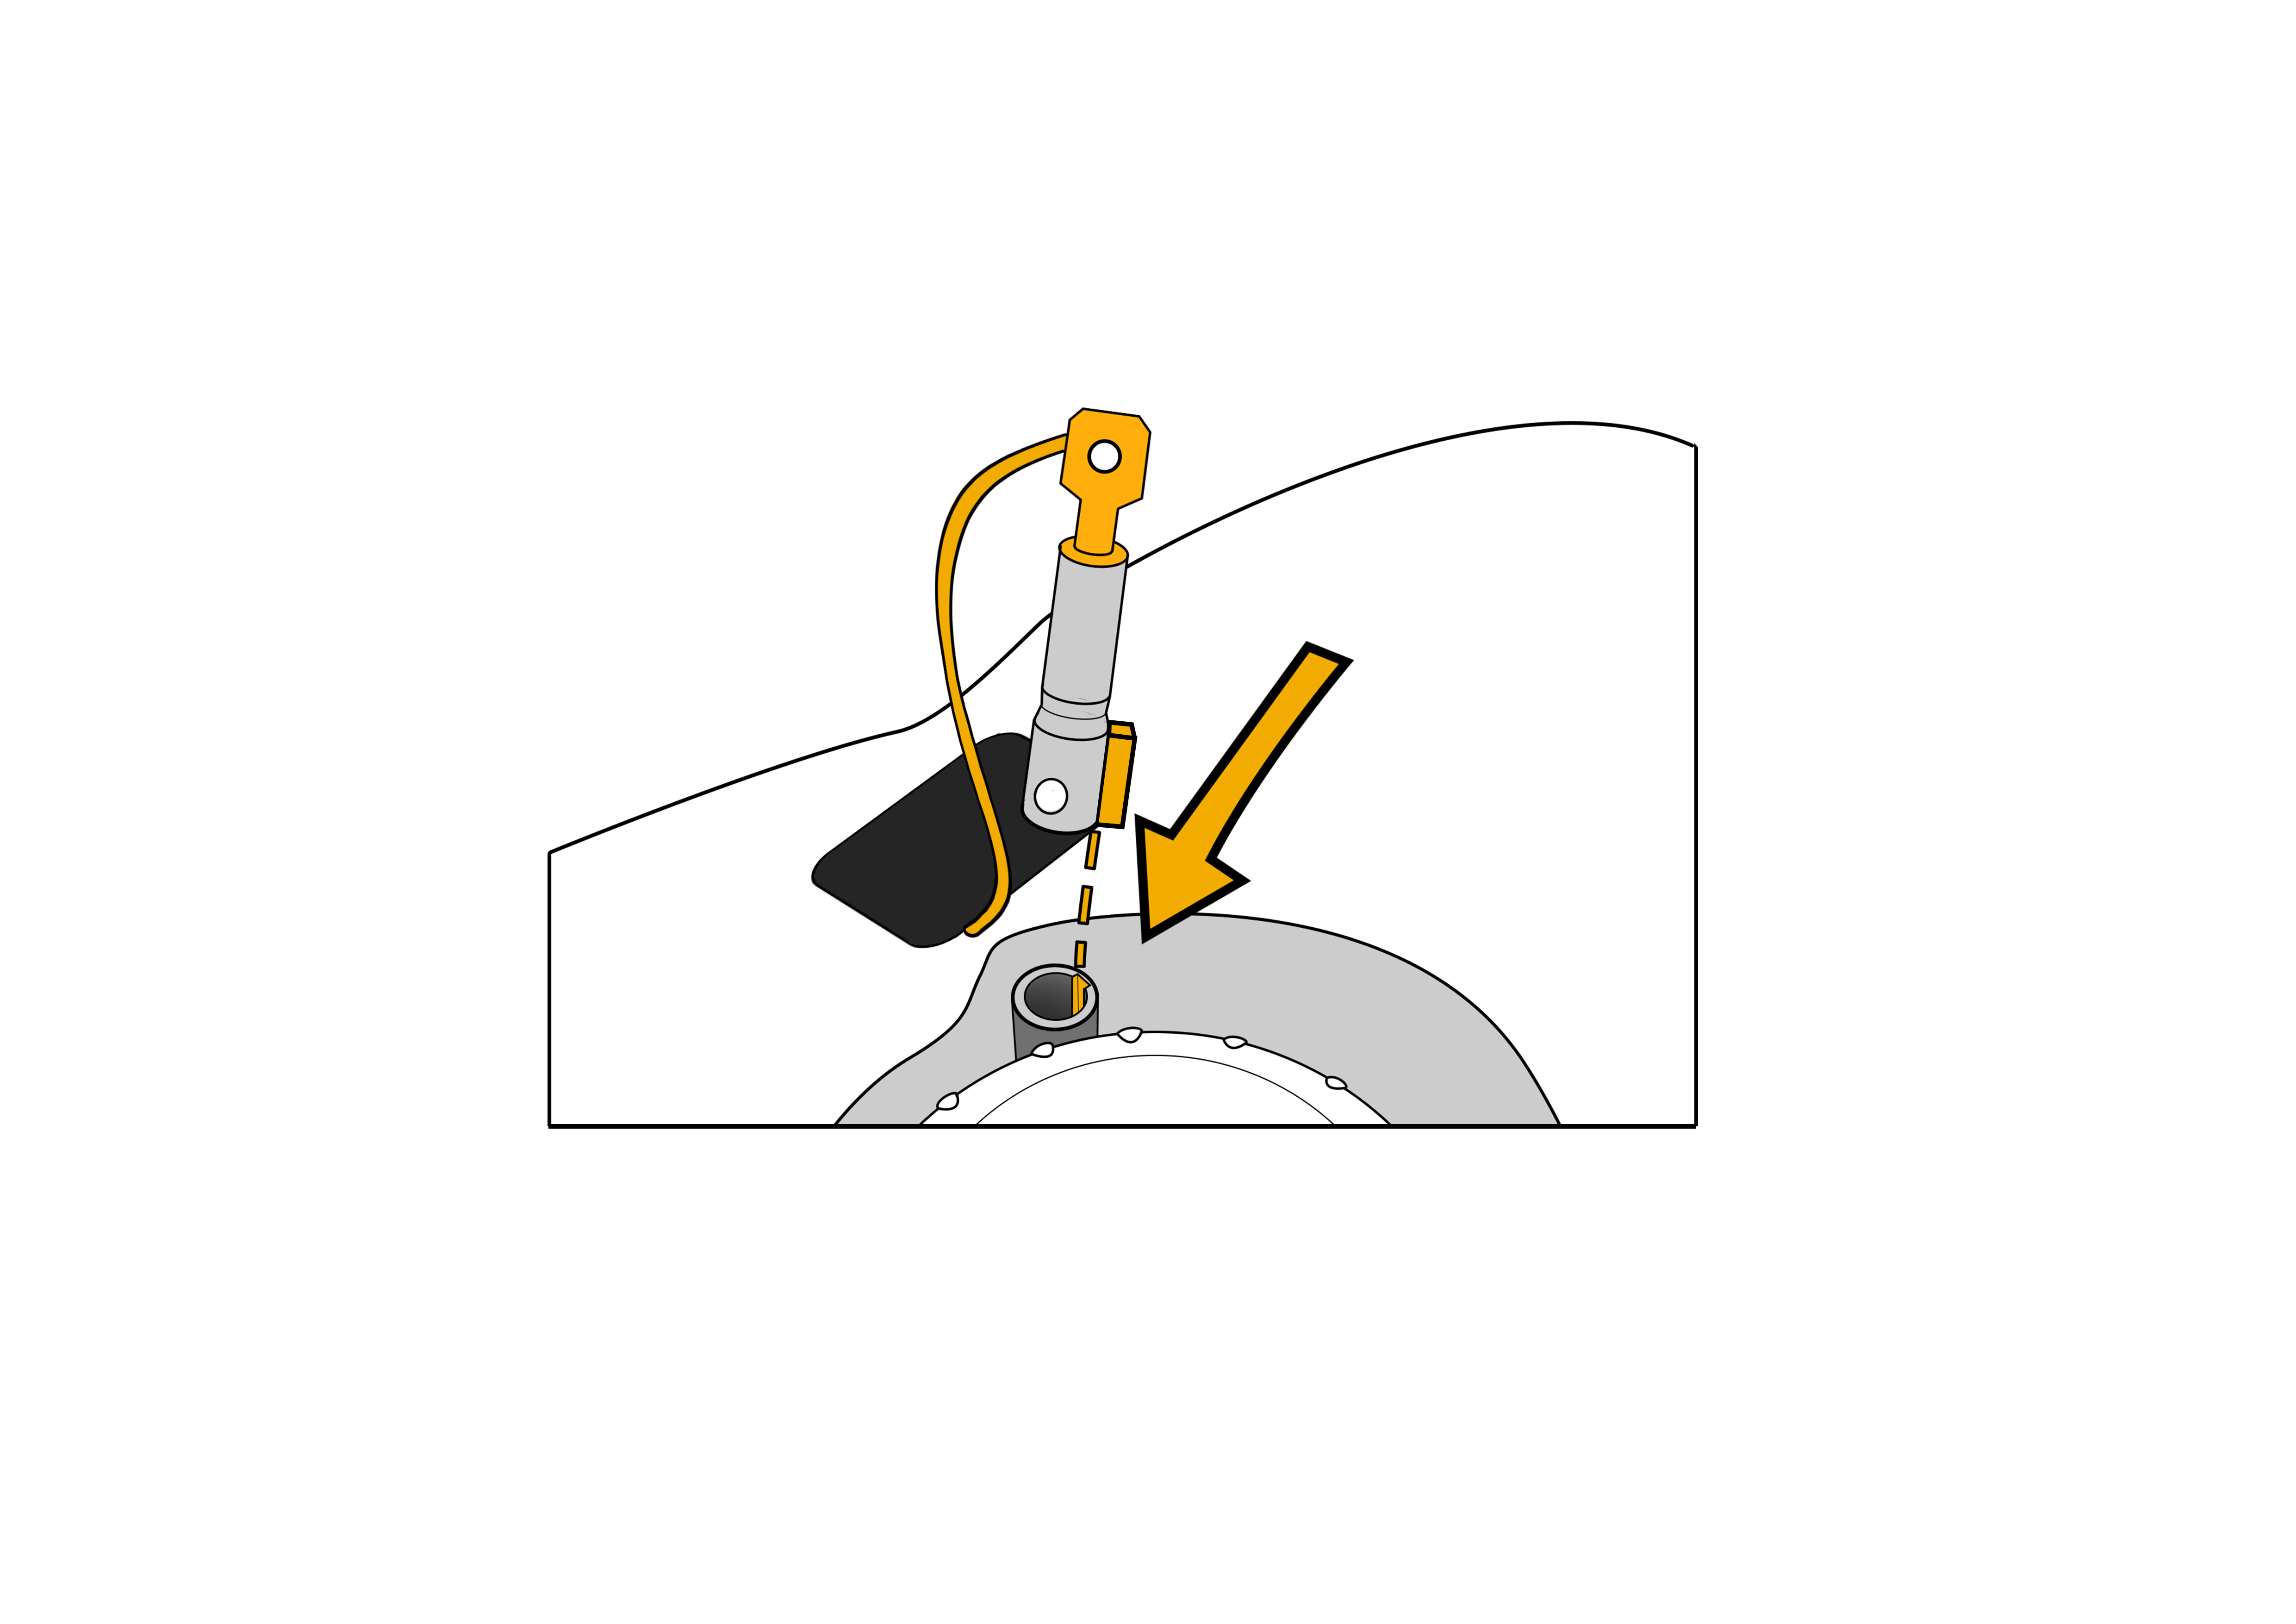
This safety plug allows you to quickly shutdown SEASAM in case of emergency. Once the plug is pulled out of its socket, the drone will immediately shutdown. In order to be able to restart the drone again, the plug needs to be put back into its socket. This plug is mandatory for the activation of the drone. When removing or adding weights, make sure you keep the cord attached to the screw.
IMPORTANT! Do not let the cord float free in any case! If it floats free, it will get stuck in the motor and potentially damage the drone!
The drone and the underwater remote control are communicating underwater thanks to acoustic. In order to ensure the communication, the drone and the underwater remote control must have been synchronized.
The synchronization happens when turning on the drone, the underwater remote control must stay on the drone until the end of the starting process when the underwater remote control indicates “disarmed ready”.
If you are using several drone at the same time, choose a different channel (0, 1 or 2) for each drone at the starting up of the underwater remote control to avoid miscommunication between the different drone and remotes.
The Seasam drone has a slightly positive buoyancy which allows it to rise to the surface in the event of a problem.
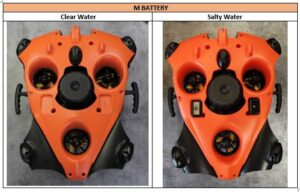
The salinity of the water has an impact on this buoyancy as well as the type of battery used. Thus the buoyancy is managed by the addition of weight or foam.
M Battery
The M battery is the standard battery used with the drone. The drone comes with the corresponding weights.
• Freshwater Navigation: No weights used.
• Saltwater Navigation: Using weights.
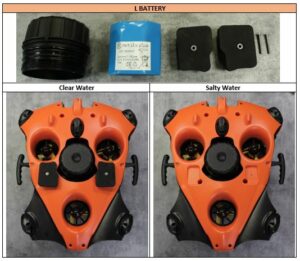
L Battery
The L battery is wider than the M battery and requires the addition of foams and weights are not used.
• Freshwater Navigation: Using Foams.
• Saltwater Navigation: No weights or foams used.
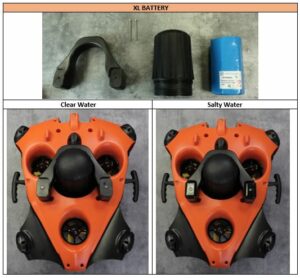
XL Battery
The XL battery is much larger than the other batteries. It requires the use of a foam in addition to the standard weights.
• Freshwater Navigation: Using Foams.
• Saltwater Navigation: Using standard foam and weights.
The three buttons on the underwater remote control allow you to navigate through the various menus.
• The “Select” button at the top of the remote control allows to:
– Turn on and off the remote control.
– Confirm Scenario and Mode selection
• The right “Scen” button allows to:
– Access the Diver Tracking Scenarios menu with long press.
– Scroll down on the Scenarios or Modes screen.
• The left “Mode” button allows to:
– Access the Modes menu with long press.
– Scroll up Scenarios or Modes on the screen.
Select a Diver Tracking Scenario
Press and hold the “Scen” button to access the Scenarios drop-down menu. Then use the right and left buttons on the underwater remote to navigate between the scenarios and press “Select” to activate the selected scenario.
Choose a Mode
Press and hold the “Mode” button to access the Modes menu. Then use the right and left buttons to navigate between modes and press “Select.” to activate the selected mode.
Shortcuts
Press the top Select button twice.
➔ Activation of the Follow Scenario
Press the left button “Mode” twice.
➔ Activation of the “360” Scenario
Press the right “Scen” button twice.
➔ Activation of the Come to Me Scenario
Simultaneously press the two side buttons “Mode” and “Scen.” ➔ Activation of the Disarmed Scenario
Simultaneously press the 3 buttons
➔ Shutting down the underwater remote control.
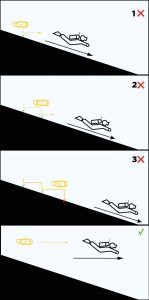
The operating principle of the drone makes it follow the remote control placed on the diver at a given distance, maintaining a depth almost identical to that of the remote control (a little above by default).
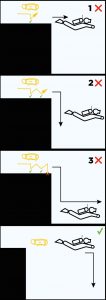
If, during the dive, the seabed is sloping, slanted or there are drops, the diver must ensure that the drone passes the “obstacles” and stages of the course after it.
Indeed, the drone always tries to keep up with the diver even if it detects an obstacle (the seabed): the depth instruction has priority over obstacle avoidance.
Therefore, if the diver makes a descent along the seabed and without considering the follow distance with the drone, the drone will make a downward movement to follow the depth of the diver and can thus be stuck on the seabed.
In this case of seabed detection, the drone stops, and its engines are disarmed; its lamps start to flash quickly, and sound signals are emitted.
It will then try to rearm his engines to resume tracking if it still detects a valid acoustic signal (and therefore the distance between the drone and the underwater remote control is not too important).
If the diver continues his descent without paying attention to the drone, the drone can begin to “plow” the ground while advancing.
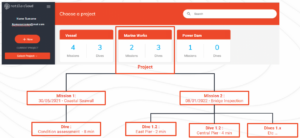
The tree structure of Notilo Cloud is as follows.
A project contains several missions, which themselves contain dives.
For example, your project can be a integral hull inspection, and each mission, a specific area inspected with different dives.
Only Administrators can create a User.
Create a User
In the “ADMIN” menu
The new created user appears in the list of Users.
Provide the User with credentials
The password must then be shared to the new User
Affiliate the User to a Project
The Users must then, be affiliated to a Project in order to be able to consult the Mission(s) of the Project with the Dives.
In the “ADMIN” menu
The User can now access the Project, consult and add information and datas related to this Project.
When creating new users on Notilo Cloud, you will have to assign particular groups according to the accesses you want for him. Please take note of the different characteristics of these groups :
report:
This group is to be assigned to users who need access to the Report tab of Notilo Cloud as part of a hull inspection use. If this group is not added, then the user will not be able to generate or even see the hull inspection report made as well as its various features.
viewer_report :
The user who has been assigned this group cannot create projects, create users, manage access to the different projects, load data and generate a report.
He will only be able to view the report and, if he belongs to the “report” group, modify observations and image selections (not annotations).
admin :
A user belonging to the “admin” group can create projects and missions, as well as load data and generate a report and edit it (if he belongs to the “report” group). He can also create new users and manage access to the different projects in the working environment.
editor :
An “editor” access does not allow the user to create projects nor to create new users / manage accesses to different projects.
However, he can create missions, load data and generate reports and, if he belongs to the “report” group as well, modify it.
It is of course possible to add several groups to one and the same created user.
With your credentials you access a workspace that is dedicated to you, containing only the information that concerns your drones and your operations.
You can create Projects and Missions to organize the datas collected by the drone.
if you need more information please consult the dedicated documentation.
Notilo Cloud is available following this link .
Your credentials to connect to Notilo Cloud have been granted by Notilo Plus in a specific email. If you have lost your credentials please contact support@notiloplus.com.
If you cannot synchronize your drone & remote, and SEASAM flashes its green and blue LEDs alternatively, it means that SEASAM’s remote needs to be activated and updated.
To update your remote, please follow the following steps:
You may now proceed with the first time setup, and your drone will be ready to dive!
During the update process of SEASAM, the firmware may get stuck because of a temporary connection loss. If this happens, the progress bar stops moving and the update gets stuck.
If this happens, turn off your remote, then put it on SEASAM to shut it down. The app will display an error message. Turn the remote back on, then turn SEASAM back on and resume the update process via the app.
Do not turn off the drone by removing the battery or the emergency plug. As it could damage the drone and its internal components as well as disrupt the pressure sensor inside the drone.
The emergency plug should be removed only in emergency situation.
To turn SEASAM off properly :
SEASAM will continue to flashes its lamps until full shut down. Then the green front LED will turn off.
You can now remove the battery.
Yes, it is possible to use the Navigator in supervised mode, but you must be careful about the depth of the diver, depending on the length of the cable.
When descending to depth, if you do not respect the length of the cable, then the Navigator can be towed by the drone and can be totally submerged. This can damage connectors that are not waterproof.
Notilo Cloud is a consultation and annotation platform that allows posteriori to the dive to organize, store and review the data collected during the Dives.
These datas are linked to the Media recorded during the Dives and can be shared collaboratively between the different Users.
You can connect to Notilo Cloud following this link
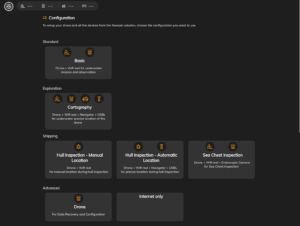
Each time you connect to the Seasam Control application, you must choose the configuration you will use when using Seasam. In other words, the use you will make of your Seasam drone, as well as the different equipments you will need.
Basic : This configuration allows a ROV mode
→ Composed of a WiFi Reel or Navigator/Ground Station and the Seasam drone
Cartography : This configuration allows you to display the GPS location of your drone and the Navigator
→ Composed of the Navigator/Ground Station, a pair of antennas, a pair of USBL and the Seasam drone
Manual Location – Hull Inspection : This configuration allows you to manually add the location of your Seasam drone relative to the hull of an inspected hull
→ Composed of a WiFi Reel and the Seasam drone
Automatic Location – Hull Inspection : This configuration allows you to obtain the location of the inspected ship’s hull automatically
→ Composed of the Navigator/Ground Station, WiFi Reel, a pair of USBL and the Seasam drone
Sea Chest Inspection : This configuration allows to inspect difficult to access areas such as the sea chest of a ship
→ Composed of the ExploCam and the Seasam drone
Drone : This configuration allows you to connect directly to the drone’s WiFi to retrieve dives without connecting to the WiFi Reel
→ Composed of the Seasam Drone alone
Internet only : This configuration is used when your tablet is connected only to the Internet in order to send dives to Notilo Cloud or download the map before use in cartography mode.
In the case of a battery leak in the battery cover, your battery is potentially damage. Therefore, do not recharge it. Place it carefully in a safe place in case of thermal runaway. After 48 hours, the battery will be inert, you can now bring it to the waste disposal center.
If your battery has been in contact with water and seems to swell, it is imperative to put it away, if possible outside a building to avoid any risk of thermal runaway.
Notilo Plus does not take back damaged batteries. We invite you to bring your defective batteries to a specialized waste disposal center.
It is possible to add elements on my drone (weight, foam, clip, camera,…). Nevertheless, it is important to keep in mind that the buoyancy of the drone has been studied, without additional elements, and according to the different waters where you dive.
Therefore, this buoyancy can be impacted if you add elements, make sure you can obtain a neutral or slighly positive buoyancy. This will prevent the drone from straining to support the additional weight (this impact the battery life too) and to prevent the drone from sinking and allow it to come to the surface.
When turned on with a magnet, the drone flashes indefinitely with all its LEDs, but will not start. This is related to the emergency stop which can slightly rotate in its depression. Indeed, the plug is well enough positioned to turn on the drone but not enough to start it. This is why your drone indicates this by flashing its LEDs.
If you encounter this problem, remove your emergency stop stick completely and put it back perfectly in the axis for the drone to start.
After inserting the battery in the dedicated space, you will hear a sound signal. That indicates that your battery is correctly plugged. You can now screw the battery cover back on. After making 4 turns, make sure there is no gap between the battery cover and the battery compartment.
It is also recommand to check the good positioning of the joint present on the battery cover, which allows the waterproofness.
Also check that the joint is properly greased and that there is no impurities that could alter the waterproofness.
There are two different types of connexion independent from the versions of WiFi Reel.
Standard connexion
This connector is not waterproof. Be sure to always check there is no water left and dry it if needed.
When not using it keep always the black caps closed.
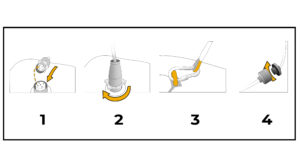
To connect the WiFi Reel to the drone, first remove the black protective cap on the drone and the connector of the WiFi Reel cable.
Screw the two caps together to prevent them from hanging and getting stuck in the engines. And thus avoid any damage to the drone.
Screw the WiFi Reel cable to the drone, making sure to align the cable guide in the plug on the drone.
Hold the connector straight and screw the cable to the drone, using the screw ring provided for this purpose. There is no need to force, use the screw ring.
Subconn connexion
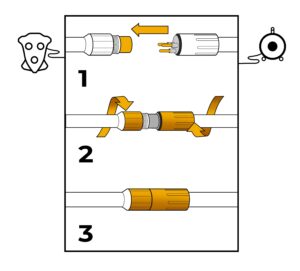
This connector is waterproof. You can open it underwater if needed. In order to ensure the longevity of the connector regularly put grease on the pins.
On the drone and on the WiFi Reel, unscrew the red nuts and separate the tips.
Make sure to reconnect the tip of the drone connector to the connector of the WiFi Reel so as not to lose it.
Connect the cable connector to the drone connector and screw back the red nut.
There are two LED on the WiFi Reel. One showing the status of the WiFi Reel when the other is showing the level of battery.
Meaning of the status LED (version 1 and 2)
Meaning of the status LED during charge (all versions)
There is different version of WiFi Reel with different connexion with the drone. The overall functioning is not different between the generations, the difference can be spotted in some details listed below.
Do not hesitate to contact us to know which generation you are using.
Version 1
When turning on the WiFi Reel the status LED will flash once white then quickly blue.
Charging time: 14h
Using time: 8h
You cannot charge and use the WiFi Reel at the same time
Version 2
When turning on the WiFi Reel nothing appears until several seconds when the status LED start flashing quickly in blue.
Charging time: 6h
Using time: 8h
You can charge and use the WiFi Reel at the same time
Version 3
When turning on the WiFi Reel nothing appears until several seconds when the status LED start flashing quickly in blue.
The Blue LED will constantly flashes in blue regardless if the WiFi Reel is connected or not with the drone and the tablet.
The password to connect will be given by Notilo Plus Team and you won’t be able to find it thanks to SEASAM Control App.
Charging time: 6h
Using time: 8h
You can charge and use the WiFi Reel at the same time
It may happen that when you have rebooted your drone (after an update for example) the video feedback does not appears anymore on the Seasam Control App.
You can only see the indication “waiting for drone connection”.
In this case simply select “ROV” or “Supervised” to restart the video feedback.
Also ensure that the unit control is still connected in WiFi with the WiFi Reel.
We mostly recommend to always restart the Seasam Control App when you restart your Seasam drone.
If the the video feedback does not come back please contact us for support at support@notiloplus.com.
Do not open the remote or perform any repair yourself
The two antennas, present on the Navigator and on the Ground Station are fragile and need to be handled with care. To screw the antennas on, the metal ring on the Navigator as well as on the Ground Station must be held.
As soon as the drone is turned off, for example in a situation of battery change, it is mandatory to turn off and turn on the Navigator too. This allows you to synchronize them together correctly.
Press and hold the ON/OFF button on the front panel. The blue and orange LEDs will turn off. Your Ground Station is now turned off.
Press the black button on the front panel, the first two blue LEDs of the antenna will light up. The orange LEDs indicate the charge level.
The Ground Station is operational after 2 or 3 minutes when the blue LEDs of the antenna are light up.
The length of the cable is customized according to the customer’s needs
No, the Ground Station is not waterproof. It must remain close to the operator in a dry place.
The signal range between the two antennas is about 100m. It is recommended not to send the Navigator and the drone beyond 100m from the Ground Station.
No, We advise you not to touch the elements when not specified by Notilo Plus. If you have any doubts, do not hesitate to contact the support department by e-mail at support@notiloplus.com
The Navigator is waterproof but you have to be very careful with the connectors which are not. Remember to dry them well before connecting them or plugging them back into their caps.
The Navigator is towed by the drone.
When activating the Supervised mode or starting a dive in Follow mode (only the drone and the diver) the drone is not following the diver.
Here are some point to check :
Each time you see an error on the screen of the underwater remote, check if your Seasam drone is up to date. Refer to the user guides to see how to do it.
Try to turn off and on again the drone leaving the underwater remote on the drone until it indicates “disarmed ready”.
The “Battery leak” error may have different causes
Check the compartment and clean it with a towel. You can also use a compressed air spray to dry the connectors. You can also let the drone with the battery compartment opened in a dry place for several hours in order to let it dry.
The upper and lower parts of the battery are blotting. Batteries must be stored on a dry space. Check the battery’s connectors and use a compressed air spray to dry them.
Try with another battery to ensure the issue comes from the battery and not the drone.
If the battery is not correctly positioned on the connectors, it may be detected as a battery leak. Always ensure you are correctly closing the battery compartment.
If after having check everything and swipe batteries the indication “Battery Leak” remains on the screen please contact us for support at support@notiloplus.com.
Do not open the drone or perform any repair yourself
There are three different ways to control SEASAM.
ROV Mode: SEASAM is connected to the WiFi Beacon and driven from the surface by the controller. The video from the on board camera is displayed on the SEASAM App.
Follow Mode: SEASAM follows the diver and responds to the command sent from the remote. The drone is not connected to the WiFi Beacon and does not share the video from the on board camera.
The diver can change the scenarios thanks to the remote.
Supervised Mode: SEASAM follows the diver but is also connected to the WiFi Beacon and the video from the on board camera is displayed on the SEASAM App.
At any time the control can be taken from the SEASAM App and the drone can be controlled from the surface by the controller.
In the Supervised Mode, the drone follows the diver only in “Follow” scenario. The scenarios can be change from the surface directly on the SEASAM App. It depends on who has the control.
Yes, you can use any batteries provided by Notilo Plus.
SEASAM automatically detects its charge level and communicates it on SEASAM Control.
When the battery level becomes critically low, SEASAM will flash its blue LED quickly and send an alert on the Seasam Control’s screen.
Bring SEASAM near the surface and Disarmed it to be able to handle it safely.
If the battery is completely empty, SEASAM will shutdown and slowly rise to the surface thanks to its slightly positive buoyancy (Do not forget to add or remove the weight according to the type of water you are diving into).
You will be able to bring it back by pulling the cable. Be sure the carabiner is attached to the drone’s hull to avoid any damage on the connectors.
The charging time of a battery is 2h30.
The internal camera is used by the drone to film the inspection done with SEASAM. The video is displayed on the SEASAM App and you can record or take pictures.
While using SEASAM in Follow Mode, the camera is part of the tracking diver system.
The WiFi Reel is composed of two elements:
Connect the reel cable to the drone and connect the control unit with the Seasam Control Application to the WiFi Reel.
Then drive the drone remotely with video feedback from the drone camera live on the control unit
The drone produced sounds when it is activated and then the only sound comes from the propellers and it is not noisy.
The frequency and level of its acoustic emissions are not dangerous for the marine fauna and flora.
The maximum depth SEASAM can reach is 100 meters
SEASAM can swim in currents reaching a speed of 3 knots.
With its 7 propellers and internal stabilization system, it will remain stable even in strong currents.
The maximum speed SEASAM can reach is 1.5 meters per second underwater.
SEASAM comes with two integrated lights. These lights are 1000 lumens each, and are directly connected to the drone’s battery.
Yes, SEASAM is slightly buoyant, even in fresh water!
It uses its vertical propellers to stabilize itself vertically. It is possible to adjust the drone’s buoyancy by removing or adding the two weights on the inferior hull.
Ensure that the rope of emergency plug is fixed with the screw even without the weights.
No, the battery must be changed only in dry environment.
The battery is protected in a watertight compartment, ensure that water never comes inside the compartment.
Yes, SEASAM is fitted with a low light colour camera able to film in 1080p.
The characteristics are: FOV 139° – aperture F1/2.8 – focal lens 2,8mm.
The video from the on board camera is displayed on the SEASAM App when the drone is connected to the WiFI Beacon in ROV or Supervised Mode.
The battery is lithium-ion based. Its power specifications are the following: 14.4V, 6,6Ah and 95Wh.
You can take batteries with you when you travel by plane.
However, you need to put them inside your hand luggage, as removable Li-Ion batteries are forbidden in checked-in luggage.
You can check our warranty policy by heading over to our terms & condition page.
The maximum depth of SEASAM is limited to 100 meters. Thanks to its internal systems, SEASAM will stop automatically at this depth, even if you don’t.
If you are using SEASAM in Supervised or Follow mode please check the maximum authorized depth in the country you are.
Concerning SEASAM purchases, the consumer is solely responsible for the management of taxes and customs charges applicable in his country.
Yes, updates will be regular according to feedback and natural evolution of the product.
Turning on SEASAM’s lights does have an impact on its battery life, although it is kept to a minimum. With normal conditions, the battery life with lights on should be about one hour.
If something happens to SEASAM underwater, such as an important shock or if a leak is detected, SEASAM will automatically surface by activating its Emergency surface mode.
If you are diving with SEASAM, do not attempt to swim back up to it right away – always respect proper diving safety procedures.
If there is an emergency or distress situation, it is important to activate the “Disarmed” scenario. It will help you stop the drone and bring it manually to the surface.
In ROV or Supervised Mode, also activate the “Disarmed” scenario, you will be able to bring it back by pulling the cable. Be sure the carabiner is attached to the drone’s hull to avoid any damage on the connectors.
If SEASAM detects a leak inside its battery compartment or in its electronic components, it will surface and turn off.
If you are diving with SEASAM, do not attempt to swim back up to it right away – always respect proper diving safety procedures.
If there is an emergency or distress situation, it is important to activate the “Disarmed” scenario. It will help you stop the drone and bring it manually to the surface.
In ROV or Supervised Mode, also activate the “Disarmed” scenario, you will be able to bring it back by pulling the cable. Be sure the carabiner is attached to the drone’s hull to avoid any damage on the connectors.
In order to update SEASAM, use the official SEASAM App available on the computer you bought with the drone. Check for the update on Settings > Drone Update and select “Automatic Check for Updates”. The update’s download will start automatically.
If you are not able to update the drone, please contact our technical support by email support@notiloplus.com.
Please keep in mind that unless a critical update is needed, you will be able to dive with SEASAM without updating it.
If you found a bug on SEASAM Control, please let us know by contacting our technical support by email support@notiloplus.com – this will be greatly appreciated!
If your SEASAM has a strange behavior underwater, make sure to complete the following steps:
Make sure that the hydrophones of the drones (represented by the five black protections around and under the drone) are not covered by anything and free of any micro-bubbles.
If the problem persists, please contact technical support with a detailed report on SEASAM’s behavior.
If you have any doubts on the drone’s behavior, activate the “Disarmed” scenario.
If you are in Follow Mode, it will help you stop the drone and bring it manually to the surface.
In ROV or Supervised Mode, also activate the “Disarmed” scenario, you will be able to bring it back by pulling the cable. Be sure the carabiner is attached to the drone’s hull to avoid any damage on the connectors.
If SEASAM Control doesn’t detect your SEASAM, you can bring the computer closer to the drone.
If the problem remains please contact our technical support by email support@notiloplus.com
It is not recommended to switch off SEASAM underwater as it is prohibited to turned it on underwater.
In case of emergency you can switch off the drone by pulling out the safety plug under the drone.
Otherwise, the drone can only be deactivated :
After having switched off SEASAM underwater (in case of emergency) bring it back to the surface and restart the drone there.
The hull is conceived to withstand significant shocks. However, do not forget that obstacle avoidance is not activated in ROV Mode ans can be deactivated in Supervised Mode.
You should always check SEASAM’s position in order to avoid collisions as much as possible. If a problem is detected, the drone will automatically surface.
If you are diving with SEASAM, do not attempt to swim back up to it right away – always respect proper diving safety procedures.
In ROV or Supervised Mode, activate the “Disarmed” scenario, you will be able to bring the drone back by pulling the cable. Be sure the carabiner is attached to the drone’s hull to avoid any damage on the connectors.
If there is an emergency or distress situation, it is important to activate the “Disarmed” scenario. It will help you stop the drone and bring it manually to the surface.
In any case, please remember that SEASAM is always under your responsibility.
In Follow Mode you should always keep en eye on the drone even if the drone is equipped with obstacle avoidance.
It is also a matter of security.
In ROV Mode the obstacle avoidance is deactivated and in Supervised Mode you can activate and deactivate the obstacle avoidance at your convenience.
Reminder: in Follow Mode the obstacle avoidance is deactivated between 0 and 2 meters depth.
In any case, please remember that SEASAM is always under your responsibility.
You can configure your SEASAM via SEASAM Control and the Settings tab.
In order to connect SEASAM to your control unit, you need to use the WiFi Reel and the SEASAM Control App.
Open SEASAM Control App on the control unit delivered with the drone.
Connect the WiFi Reel to the drone thanks to the cable and secures it with the carabiner.
Switch on the WiFi Reel, the blue LED is flashing quickly
Switch on the drone; the WiFi Reel and the drone are connected when the blue LED is flashing slowly.
Connect the control unit to the drone’s WiFi “seasam-0044BXXXXXX”. (If you cannot detect the WiFi signal bring the control unit closer to the drone)
The password to connect to the WiFi Reel’s WiFi will be displayed and you can find the password in Settings > WiFi Reel Settings.
Copy the password, connect to WiFi Reel’s WiFi “seasam-beacon-XXXXXXXXXXXX” and paste the password. The password should be entered only once, the control unit will then connect automatically to the WiFi Reel.
Go to the “Home” tab, your drone is ready, you can see the video from the drone on your control unit.
In order to turn SEASAM on, put the fully charged battery in its compartment. Make sure that the compartment is correctly closed and the emergency plug correctly positioned.
Switch on the remote by pressing few seconds the “Select” button at the top of the underwater remote and put it on the dedicated support on the drone. Don’t remove it until the end of the process.
Choose a channel, the drone will switch on and test all its components (lights activation, propellers, sound signal).
At the end, the remote indicates “Disarmed ready” the drone is ready to dive.
Switch off the remote by pressing few seconds the “Select” button at the top of the remote and select “yes”. Or press the three buttons of the remote at the same time.
Put the turned off remote on the dedicated support on the drone. Leave it there for at least 15 seconds then remove the remote.
The drone turns off as well as the green LED.
Do not turn off the drone by removing the battery or the emergency plug. As it could damage the drone and disrupt the pressure sensor inside the drone.
The emergency plug should be removed only in emergency situation.
To change SEASAM’s battery, put the drone upside down, open the battery’s compartment and replace the battery.
Make sure there is grease on the seal and no dirt to ensure the sealing.
In order to facilitate the opening and the closing of the battery’s compartment, do not hesitate to use the dedicated tool. If you do not have one, please contact the support by email support@notiloplus.com
If the drone is connected to the WiFi Reel, make sure you do not let the cable connected to the drone while changing the battery, it might damage both the drone and the connector.
You can also head over the tutorial section to watch the video.
Make sure to carefully follow the instructions in order to keep the drone waterproof.
The SEASAM underwater remote control is equipped by an acoustic transmitter at the end of the cable that communicate the order to the 4 hydrophones on the drone.
The drone is able to triangulate the position of the diver thanks to the transmitter’s remote control and a pressure sensor in the underwater remote control. So it is important not to leave too much distance between the transmitter and the underwater remote control. When in Follow or Supervised Mode.
Make sure that you do not lose it underwater!
Turning on the underwater remote control.
Press the Select button for a few seconds to turn on the underwater remote
control. There is no need to hold the button.
Turning off the underwater remote control.
Press and hold the Select button. A drop-down menu appears with the
following indications: OFF, Works and Supervise.
Select “OFF” to display the “Shutdown” menu. Then select “Yes” with the left
button to confirm the shutdown.
The obstacle avoidance is done by means of an acoustic signal.
The drone detects obstacles in a radius of 1 meter to 1.5 meter around it; it can be represented as a sphere of about 3 meters in diameter with the drone in its centre.
Obstacle avoidance therefore only activates from a depth of 2 meters to avoid detecting the water surface as an obstacle.

When the drone detects an obstacle, its reaction is to slow down or stop, to take height and start again.
This loop will repeat itself as many times as the drone detects the obstacle.
(Sand, landforms, algae, air bubbles, another diver, an object floating in the water etc. can be considered as obstacles by the drone.)
During the obstacle avoidance action, the green LED on the front of the drone flashes to show you the obstacle detection.
If the diver moves forward while the drone slows down following an obstacle detection, the distance between the drone and the diver will increase and may reach a threshold where communication between the transmitter of the underwater remote control and the drone will no longer be operational – The drone will no longer receive a valid signal from the underwater remote control.
If the absence of a valid signal continues for more than 90 seconds, the drone will enter a protective mode, and will engage the “surface” scenario to return to the surface automatically.
Once it reaches the surface, it will disarm and stabilize at a depth of about 50 cm, waiting to be recovered or to receive a new order.
It is always recommended to monitor the drone and keep in mind that once on the surface the drone can be carried away by the swell and drift.
For the first starting up, SEASAM will need to be updated and registered.
To do so, please follow these steps:
In ROV Mode you do not have access to the scenarios. You simply control the drone from the controller.
In Supervised Mode, you can change the scenarios directly from the SEASAM Control App when the control of the drone is managed from the surface. On the right side of the SEASAM Control App there is a drop-down menu to choose the desired scenario.
In Supervised Mode, you can change the scenarios directly from the underwater remote when the control of the drone is managed by the diver with “let the diver choose” scenario selected on Seasam Control App on the right side of the App.
In Follow Mode while diving with SEASAM, press few seconds the “Scen.” button on the remote. The scenarios menu will appear, use the “Mode” and “Scen.” buttons to navigate in the menu and then press “Select” to select the desired scenarios.
To calibrate the drone, put it on a flat surface, connect it to SEASAM Control then select Settings > Drone Calibration and launch the calibration process.
To calibrate the controller connect it to SEASAM Control then select Settings > Controller Settings. Select “Calibrate Gamepad” and follow the process as indicated on the App.
The battery’s status will be displayed on SEASAM Control. If the status is low or critical you will receive an alert on the computer screen.
If you are in Follow Mode diving with the drone, you can check the battery status underwater by placing the remote above the drone on its dedicated spot. The battery status will be displayed on the remote’s screen.
When it becomes critically low, SEASAM will flash its blue LED quickly and switch to the Come scenario. You can then pick it up and finish your dive, if you are near the boat and have warned the surface safety crew, you can also send it directly to the surface using the Surface scenario.
If the battery is completely empty, SEASAM will shutdown and slowly rise to the surface thanks to its slightly positive buoyancy (Do not forget to add or remove the weight according to the type of water you are diving into).
If you have encountered a problem with your SEASAM, please contact our support by email support@notiloplus.com
SEASAM is designed to be as durable as possible. However, to guarantee the longevity of your drone it is important to respect certain rules.
Cleaning
After each dive it is necessary to rinse the drone well with clear water by insisting on the engines to clean all deposits and impurities that could eventually lead to corrosion and alter the proper functioning of the drone.
This is especially important when diving in salt water.
The ideal is to immerse the drone in a water tank by turning the propellers by hand.
Be careful to ensure that the drone is turned off and disarmed when cleaning.
Storage
• Drone
After each dive and after having rinsed the drone, let it dry a few hours before storing. Then place it in a dry space away from light.
If you own a hardcase or a softcase, make sure that the drone is completely dry before storing it inside to prevent moisture.
• Batteries
Batteries are sensitive to moisture, so it is important to store them in a dry space between each use.
After each dive, be sure not to place the batteries with the wet drone during the return transport so that they do not soak in water.
Do not leave a battery plugged into the drone when not in use.
Seal
Check that the seal of the battery compartment is always greased to facilitate the opening and closing but also to ensure the sealing of this sensitive part.
It is recommended to grease the seal every 20 dives and to change it every 50 dives.
Underwater remote control
The transmitter on the underwater remote is sensitive.
Do not carry the underwater remote control by holding it by the cable to avoid damage. Do not pull the cable either.
Also be careful not to shock the transmitter, at the end of the cable, by dropping it for example.
SEASAM is made to be resilient. Its hull is conceived to withstand significant shocks; however, you should always check SEASAM’s position in order to avoid collisions as much as possible. If a problem is detected, SEASAM will surface automatically.
If you are diving with SEASAM, do not attempt to swim back up to it right away – always respect proper diving safety procedures.
If there is an emergency or distress situation, it is important to activate the “Disarmed” scenario. It will help you stop the drone and bring it manually to the surface.
In ROV or Supervised Mode, also activate the “Disarmed” scenario, you will be able to bring it back by pulling the cable. Be sure the carabiner is attached to the drone’s hull to avoid any damage on the connectors.
Using SEASAM is relatively simple, but there are some important guidelines that are to be followed when diving with the drone.
The most important scenario to keep in mind is the “Disarmed” one. This scenario has to be activated in case of emergency or distress situation. It is also mandatory to activate it before handling the drone in and out of the water.
SEASAM is equipped with a sensor that allows the drone to identify obstacle within a 1,5 meters radius.
However, obstacles avoidance is deactivated in this case :
The drone is not able to take decisions, it will stop when facing an obstacle and wait for another command. Always keep an eye on SEASAM while diving with it.
In any case, please remember that SEASAM is always under your responsibility.
This means that your drone has detected water in its internal compartments. However, this may also be a false alarm. Make sure that the battery compartment is fully dry; if some water traces are present, remove them with a dry towel and leave the drone in a dry spot for a few minutes. If the problem persists, please contact our technical support by email support@notiloplus.com.
Make sure the fully charged battery is in its battery compartment, with its connector correctly plug in the drone and not in the travel position. Ensure the battery’s compartment is fully close. Do not hesitate to use the dedicated tool.
Verify that the safety plug under the drone, near the battery compartment, is correctly plugged in. It is attached to the drone thanks to a small rope. The plug may move a bit during transport. Do not hesitate to remove the plug to put it back and make sure to push it all the way down.
When removing or adding weights, make sure you keep the cord attached to the screw.
IMPORTANT! Do not let the cord float free in any case! If it floats free, it will get stuck in the motor and potentially damage the drone!
If the problem persists, please contact our technical support by email support@notiloplus.com